Kubernetes 101 - namespaces
The Namespace - a House in a Big Town
Namespaces are a fundamental abstraction layer of the Kubernetes architecture. They are instrumental in dividing cluster resources between multiple users, applications, departments or projects. If the Kubernetes Cluster is the town, each individual house would be the namespace (with the rooms being the pods).
This abstraction allows the Namespace's pods and resources to function independently while still being part of a greater Kubernetes architecture.
This is particularly useful for multiple teams or departments within the same business sharing the same Kubernetes infrastructure. Namespaces not only make it easier to organise Kubernetes clusters in large organisations, they simplify the management of resources.
Because resource names only have to be unique within the Namespace they sit in (for example a pod called "web-server"), we can have multiple pods with the same name in the entire Cluster ordered by the Namespace that encapsulates them.

Just as a particular house in a town has it's own household budget, Namespaces have Resource Quotas. Resource Quotas allow us to set specific budgets on how much Memory or CPU all pods can use within a Namespace.
As you can imagine, specific departments in a company require more compute than others. For example, within an animation studio like Pixar, it is not hard to believe that the Rendering department will probably need several hundreds if not thousands of times more processing resources in their Kubernetes Namespace than the HR or Legal departments.
Resource Quotas are an incredibly useful way to enforce these differences in computational requirement and divide the cluster resource budgets by Namespace. The Namespace also has LimitRanges at it's disposal, a type of policy tool that allows us to set a maximum and minimum amount of resources that each pod or container can use.
Pixar's 3,000 processor-sized Renderfarm might not be as impressive as that of OpenAI, Meta or Anthropic but at least it generates content that is actually enjoyable.
Going back to our Pixar Kubernetes Cluster example, if we set Resource Quotas to establish a hard cap for the total resource consumption of the the specified Namespace, Limit Ranges permit a greater degree of flexibility with constraining the maximum, minimum and default ranges of resource consumption for each object in that Namespace - i.e. which means a single pod can't eat up the entire Resource Quota at once for that entire Namespace at once.
Hands-On - Namespacing in the Lab
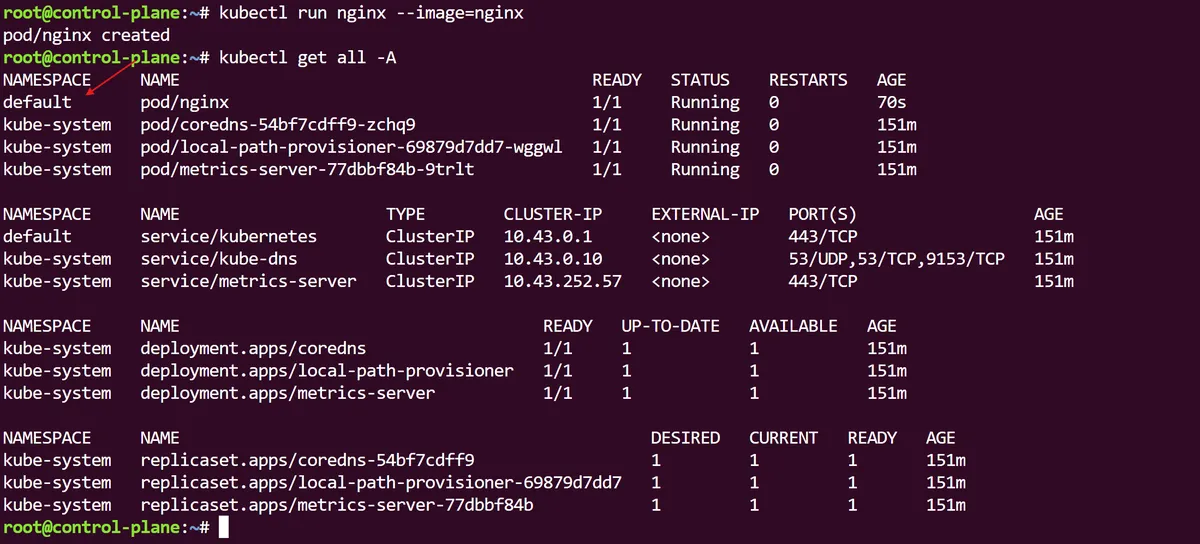
Heading over to our Kubernetes lab, we can start by first running a basic nginx pod. If we run a kubectl get all -A we can see the list of all resources within our cluster categorised by the Namespaces they sit in, including the kube-system Namespace which is default for objects created with our Kubernetes cluster - including the pod we just created.
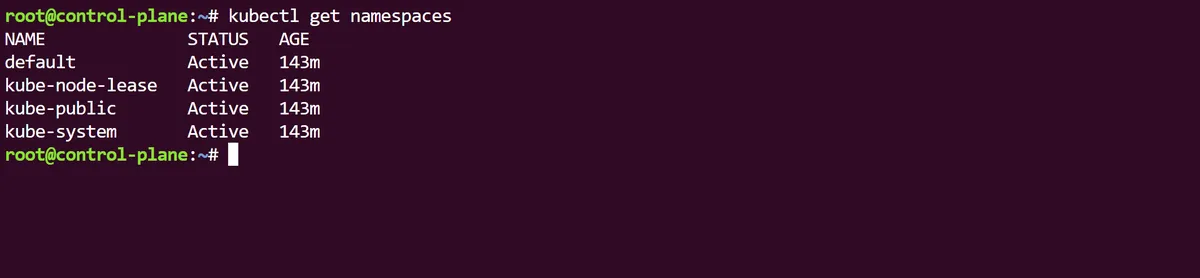
With the more granular kubectl get namespaces (or kubectl get ns for short) we can see several more Namespaces in our cluster. One of them is the kube-node-lease namespace, which is used to hold lease objects associated with individual Kubernetes nodes.
Leases allow the kubelet to send which something called node-heartbeats, a critical internal system-process, to the control plane to detect node availability or failure. The kube-public Namespace is readable by all clients (even non-authenticated), in case resources should be publicly readable throughout the entire cluster, while the kube-system namespace is for objects created independently by the Kubernetes system.
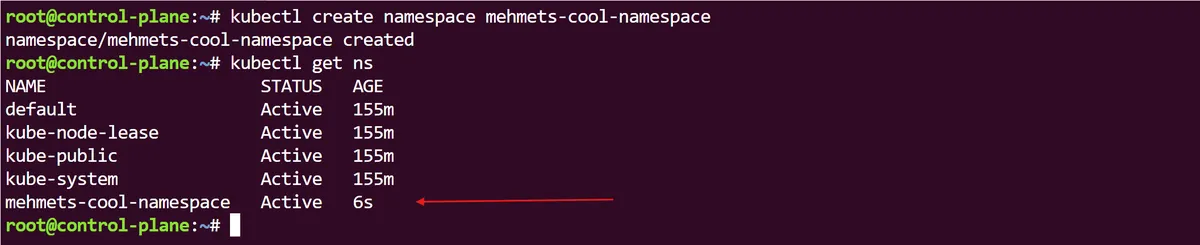
What if we want to create our own Namespace? we can simply use kubectl create namespace *name* and instantly, if we bring up all the Namespaces in the cluster again, we should see this in the list.
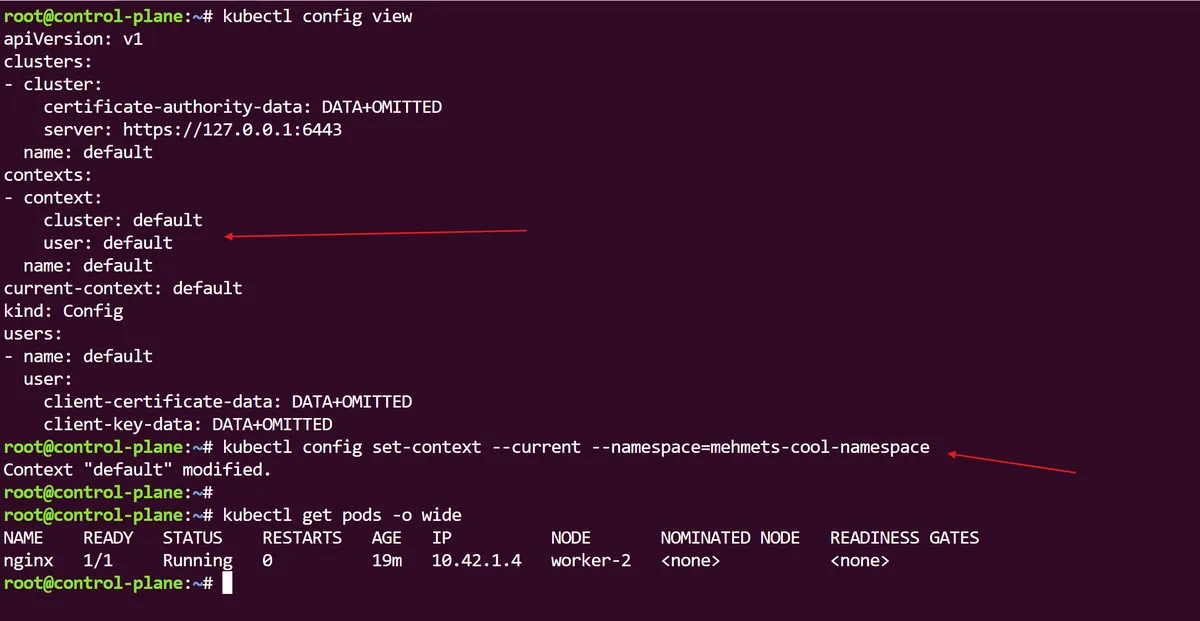
With the -n parameter, we can now run an nginx pod, but instead of the default we can specify it to run within our own, newly created Namespace. Interestingly, if we run the usual kubectl get pods command, as our pod has not been created within the default Namespace, it is not visible to us. But if we specify which namespace we want to query pods from, then it is visible:

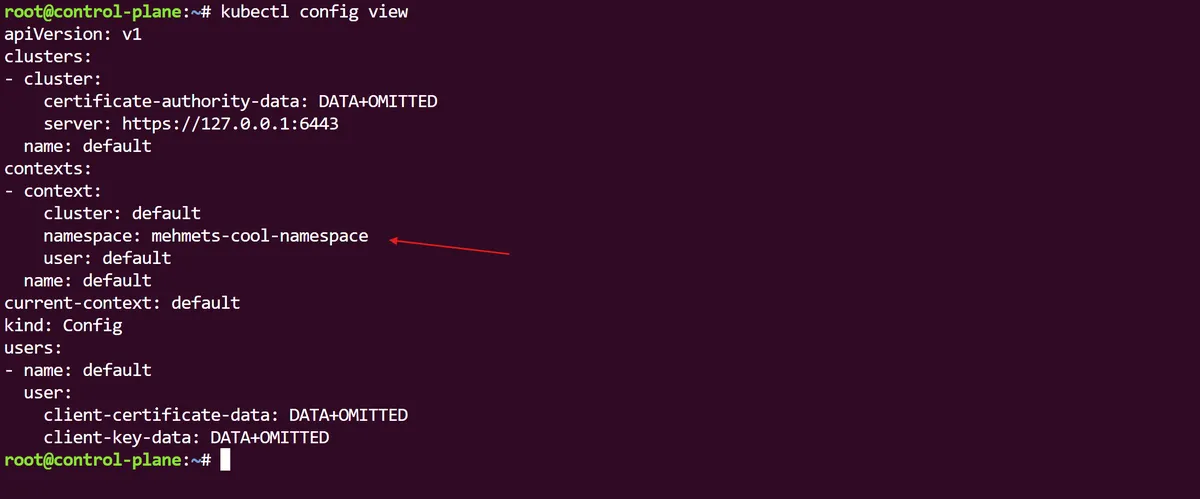
If we look at our Kubernetes configuration file using kubectl config view we can see that there is no namespace key set, which means that it will use the default Namespace. Using kubectl config we can actually change this to our previously created Namespace. So now we can query our pods without having to specify the Namespace, and we can see that the Kubernetes configuration file has updated its default Namespace.
We can now delete our Namespace with kubectl delete namespace/*namespace* --now which will in turn delete everything that sits under it including our nginx pod.
Kubernetes Namespaces are an essential way for us to partition the Kubernetes cluster into multiple tenancies in a logical and isolated way. We can manage resources, control security and prevent naming collisions to the Kubernetes resources that belong to Namespaces.
thanks for reading,
Mehmet